Tuesday, December 27, 2011

Scroll NSScrollView to Top

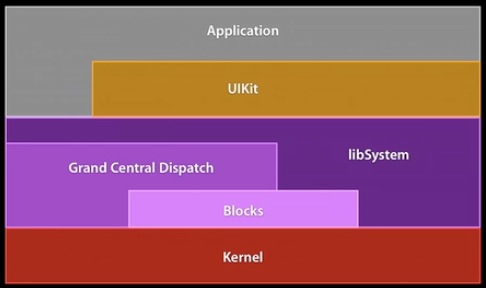
AppKit is old and is not as convenient as UIKit. But we have to use it on Mac app development.

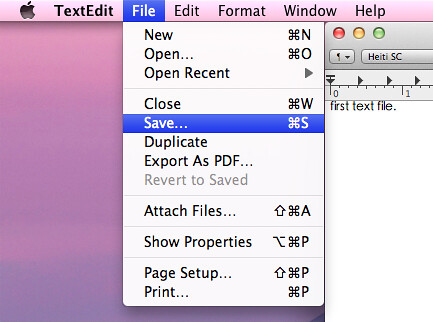
"Scroll a scrollview to top" sounds easy, but actually it isn't. If you assign a documentView to a NSScrollView, you will see it scrolls to the bottom. (Very stupid!) The doc did not mention how to scroll to top. I found a way to control the vertical scroller. I can set the scroller to top, but the scrollView is still at bottom!

This post (http://stackoverflow.com/questions/4506391/nsscrollview-jumping-to-bottom-on-scroll) inspired me. I got the solution (of cause, I post my answer on stackoverflow too):

// Scroll the vertical scroller to top

if ([_scrollView hasVerticalScroller]) {

_scrollView.verticalScroller.floatValue = 0;

}

// Scroll the contentView to top

[_scrollView.contentView scrollToPoint:NSMakePoint(0, ((NSView*)_scrollView.documentView).frame.size.height - _scrollView.contentSize.height)];

Friday, December 09, 2011

Wrong info from proc_pidinfo

proc_pidinfo is a very useful function to get a Mac OS X process's info such as the size of resident memory, consumed CPU time.

However, sometimes, the returned info is not correct. For example, a little process's resident memory becomes 4GB. Apple does not provide any document about this function, and I did not see useful comments in the header files.

I am lucky enough to see code snippet in the Apple open source file: http://www.opensource.apple.com/source/lsof/lsof-28/lsof/dialects/darwin/libproc/dproc.c. When we call proc_pidinfo, we must check the returned value. If the returned value is not identical to the size of output data, the output data is wrong.

      nb = proc_pidinfo(pid, PROC_PIDTASKALLINFO, 0, &ti, sizeof(ti));
            if (nb <= 0) {
                if (errno == ESRCH)
                    continue;
                if (!Fwarn) {
                    (void) fprintf(stderr, "%s: PID %d information error: %s\n",
                        Pn, pid, strerror(errno));
                }
                continue;
            } else if (nb < sizeof(ti)) {
                (void) fprintf(stderr,
                    "%s: PID %d: proc_pidinfo(PROC_PIDTASKALLINFO);\n",
                    Pn, pid);
                (void) fprintf(stderr,
                    "      too few bytes; expected %ld, got %d\n",
                    sizeof(ti), nb);
                Exit(1);
            }
I checked the processes with correct info. They are all my processes (not system processes). Seems like my app runs in user mode and it does not have privileges to get info of system processes.

Tuesday, October 18, 2011

Let Several Apps Use the same Facebook App ID

If you want to let your user post something from your app onto Facebook, you need to register a Facebook app and call Facebook SDK to post messages. But if you have a free version and a paid version, you would like to share the same Facebook App ID.

Just follow Facebook tutorial to register Facebook App and config your apps. https://developers.facebook.com/docs/mobile/ios/build/

The only one thing I need to mention is you must leave 'iOS Bundle ID' empty.

From Facebook doc page:

iOS Bundle ID - (Optional) You may set this to match the bundle ID for your iOS app. If you add this setting then the bundle ID of your app will be checked before authorizing the user. The benefit of this setting for SSO is if the user has already authorized your app they will not be asked to authorize it when they access your app from a new device.

Sunday, October 09, 2011

Xcode 4 and Git

I am new to Git. I used Perforce (P4) before, so I thought it is easy to use Git. Actually I was wrong. Git is not complex, but it has different concept.

In P4, we just check out and check in files. In Git, checking in has a new name Commit. When I committed my first change, I was surprised to see it does not appear in the server. Actually, Git did not really submit my code to the server. It was stored locally. I have to run this command in the command line:

git push origin master

So you must Push the local Commits to the server.

The problem is Xcode 4 can Pull, Commit, Compare, but does not provide Push functionality. How stupid the designer is. You can modify but cannot submit! Actually Pull, Commit and Compare are the only functionalities Xcode 4 provides. You cannot even revert!

Xcode 4 is free, but Apple should not make it suck.

Update on Nov 30, 2011:

SourceTree on Mac App Store is an excellent Git client. It is much better than GitX. And it is FREE!

Tuesday, October 04, 2011

Fixing the Problem of Cocos2D Game Disappearing in iPhone Simulator

I Created a new Cocos2D game. But it did not work well in iPhone simulator. It often disappeared in the simulator. I had to relaunch the simulator or relaunch Xcode. It was very boring. I didn't know why, because this project was still very simple.

I noticed there is a warning that Info.plist is included in the target. I did the following things:

1. Renamed Info.plist to ProjectName-Info.plist

2. Changed Info.plist to the same name in the target settings

3. Removed ProjectName-Info.plist from the target

The problem fixed!

Thursday, September 29, 2011

Why Use Cocos2D Instead of UIKit to Develop Games

I am leaning Cocos2D for iPhone. I am thinking why we should use cocos2D instead of UIKit to develop games.

Here are the reasons:

1. Cocos2D is built on OpenGL. You may not know OpenGL.

2. Cocos2D supports tiled map.

3. Cocos2D helps you reduce memory cost by supporting atlas images and providing CCSpriteBatchNode.

4. Cocos2D supports parallax backgrounds.

5. Cocos2D has more animations and transitions.

6. Cocos2D supports particle systems.

Cocos2D provides physics engines, but I don't think it is one of the reasons we should use Cocos2D. Because these physics engines are not designed for Cocos2D only. If you use UIKit, you can use these physics engines too.

Friday, August 19, 2011

Add Tool Tip to Controls with Xcode4

Like many Apple developers, I was a developer on Windows platform before. It is very easy to add tool tip to a control (e.g. a button) in Visual Studio. But I don't know how to do it in Xcode. When I am working on iPhone apps, it is not a problem because iPhone apps need not tool tip. But it is a problem when I am working on Mac apps.

Actually it is easy to add tool tip in Xcode 4. Looks like Apple put it in a wrong place. You need to add tool tip in Identity Inspector.

Add ToolTip in Xcode

Monday, July 18, 2011

Making Your Mac App Support Full Screen in 1 Minute

Full screen mode is a cool feature on Mac OS X Lion. I'd like to let my app support full screen. I googled, but did not find any tutorial. I thought there would be an option like'Support full screen' when a new project is created with the new Xcode 4.1 on Lion. Surprisingly, there is no that option. Today I watched a video of WWDC2011 and made this article. I am sure you can follow the steps to make your app support full screen in 1 minute.

I created a new Mac OS X Cocoa Application with Xcode 4.1 on Lion and named it MyFullScreen.

1. Set Base SDK Mac OS X 10.7

2. Choose MainMenu.xib in Project navigator

3. Choose 'Window - MyFullScreen' in Objects

4. Choose 'Primary Window' for Full Screen in Attributes inspector. You will see a new icon on the top-right corner of your main window. Run this app. It already supports full screen!

Make Full Screen

5. You need to add a menu item. Choose 'Menu - View', and then drag 'Full Screen Menu Item' in Object Library into 'Menu - View'.

Full Screen Menu Item

We are done! It is very easy.

Decreasing the iPhone/iPad app size

1. Delete unnecessary files.

2. Convert PNG images to JPG format. We like PNG because it supports transparency. But for those images without transparency, the size of png is twice of jpg file. I converted PNG files to JPG and reduced the app size from 17MB to 9MB.

3. For the universal app, iPad version could reuse retina @2x images.

The way to stop UIView animations

#import <QuartzCore/QuartzCore.h>

[self.view.layer removeAllAnimations];

Adding a framework in Xcode 4

The steps of adding a framework in Xcode 4:

1. Click current project in Project navigator.

2. Click a target in Project editor.

3. Choose Build Phases tab.

4. Expand Link Binary With Libraries

5. Click + button, add a framework.

6. Go back to Project navigator. You will see the new framework added. You can drag it into Framework group. If you have more than one target, you need not repeat the steps for other target. Just choose this framework in Project navigator, and make selection in Target Membership in File Inspector on the right Utility window of Xcode.

What's New in iOS 5 sdk

The key developer-related features introduced in iOS 5.0 (Official doc):

1. iCloud

2. Storyboard

Storyboard is not xib. "A storyboard file captures your entire user interface in one place and lets you define both the individual view controllers and the transitions between those view controllers." I think It sounds like Keynote or Powerpoint. You can design every page's content and the transition between pages.

3. Newsstand (for magazines and newspapers)

4. New Frameworks

- GLKit (Game Library Kit?). The GLKit framework (GLKit.framework) contains a set of Objective-C based utility classes that simplify the effort required to create an OpenGL ES 2.0 application.

- Core Image. A powerful set of built-in filters for manipulating video and still images, such as touching up, correcting photos, face and feature detection.

- Twitter.

- Accounts. A single sign-on model for certain user accounts. Apps can use it to access twitter account.

- Generic Security Services.

5. Automatic Reference Counting (ARC).

Actually, it is a new feature of the language and the compiler. It helps you manage the objects lifetime and memory. There are some restrictions to use ARC:

1. You don't need to (and are not allowed to) call retain/release/autorelease.

2. You don't need to (but can) implement your dealloc method.

3. You can't use NSAutoreleasePool objects. Actually, they are replaced by @autoreleasepool keyword.

3. You can't define object points in C structures.

4. You can't directly cast between object and nonobject types (for example, between id and void*).

For more information about ARC itself, see Programming With ARC.

Showing an animation when NSView loading

An UIView of one of my iOS app shows a fade-in animation. I implemented this animation in viewDidLoad. When I was porting this app onto Mac OS X, I found there is no viewDidLoad.

I tried adding the fade-in animation in awakeFromNib, but no animation appeared.

My solution: Put the animation code in a method and call it after a short delay.

[self performSelector:@selector(animationShowButton) withObject:nil afterDelay:0.2];

Implementing Fade-In Fade-Out animation in NSView on Mac OS X

It is easy to implement Fade-In animation in UIView on iOS. We just need to change alpha value in the animation.

theView.alpha = 0.0f;

[UIView beginAnimations:@"fadeIn" context:nil];

[UIView setAnimationDuration:1.0];

theView.alpha = 1.0f;

[UIView commitAnimations];

But the following code does not work in NSView on Mac Snow leopard.

[theView setAlphaValue:0.0f];

[[theView animator] setAlphaValue:0.8f];

I found addSubView and removeFromSuperview can have fade-in fade-out effects.

[[theSuperview animator] addSubview:theView];

There is a problem. We cannot change the duration time in the following code:

CABasicAnimation *animation = [CABasicAnimation animation];

animation.duration = 3.0f;

[theSuperview setAnimations:[NSDictionary dictionaryWithObjectsAndKeys:animation, @"FadeIn", nil]];

[[theSuperview animator] addSubview:theView];

Now I have the solution.

Fade-in animation:

[NSAnimationContext beginGrouping];

[[NSAnimationContext currentContext] setDuration:2.0];

[[theSuperview animator] addSubview:theView];

[NSAnimationContext endGrouping];

Fade-out animation:

[NSAnimationContext beginGrouping];

[[NSAnimationContext currentContext] setDuration:2.0];

[[theView animator] removeFromSuperview];

[NSAnimationContext endGrouping];

Change the parameter order in Objective-C formatting string

(I got this idea from cocoa programming for mac os x 3rd)

When we do localizations, the problem is the words order of a language differs to other languages. For example, this sentence "Ted wants a scooter." may be something like "A Scooter is what Ted wants" in another language.

You can localize strings this way:

NSString * theFormat = NSLocalizedString(@"WANTS", @"%@ wants a %@"); x = [NSString stringWithFormat:theFormat, @"Ted", @"Scooter"];

It works well in a language:

"WANTS" = "%@ wants a %@";

But we need to change the token order this way in another language:

"WANTS" = "A %2$@ is what %1$@ wants".

Thursday, June 30, 2011

WWDC2011 Session 323 Introducing Automatic Reference Counting

Summary: Automatic Reference Counting (ARC) dramatically simplifies memory management in Objective-C. This session introduces what ARC is, how it is implemented and how to migrate to ARC. Apple asks every developer to move Objective-C code to ARC.

Problems of memory management:

Many (new) developers do not understand reference counting. They don’t know when to retain/release/autorelease. Memory leaks and the app crashes.

What is ARC?

ARC is automatic object memory management. The compiler adds retain/release calls. It still uses reference counting. ARC is not Garbage collection. ARC is compile-time memory management, not run-time memory management.

If we write a stack, our code without ARC will be:

@implementation Stack { NSMutableArray *_array; }

- (id) init {

if (self = [super init])

_array = [[NSMutableArray array] retain];

return self;

}

- (void) push: (id) x {

[_array addObject: x];

}

- (id) pop {

id x = [[_array lastObject] retain];

[_array removeLastObject];

return [x autorelease];

}

- (void) dealloc { [_array release]; [super dealloc]; }

@end

With ARC:

@implementation Stack { NSMutableArray *_array; }

- (id) init {

if (self = [super init])

_array = [NSMutableArray array];

return self;

}

- (void) push: (id) x {

[_array addObject: x];

}

- (id) pop {

id x = [_array lastObject];

[_array removeLastObject];

return x;

}

@end

How do you switch?

WWDC2011 Learning Notes and Index

WWDC2011videos come out before I finish WWDC2010 videos.

It's time to learn WWDC2011 videos. :-)

Index

WWDC2011 Session 323 Introducing Automatic Reference Counting

Thursday, April 21, 2011

Programming with Core Animation on Mac

Learning notes of Core Animation for Mac OS X and the iPhone

1. The Simplest animation (CABasicAnimation)

Without animation: [theView setFrame:newFrame];

With animation: [[theView animator] setFrame:newFrame];

[theView animator] is the Animator Proxy which is simply finding an animation and then invoking it. The default animation is CABasicAnimation.

2. CAKeyframeAnimation

With CAfeyFrameAnimation, you can define a series of key frames. CoreAnimation system will create animation based on these key frames. For example, we want to create an animation of moving an image to point A, and then B. We only need to create the key frames of A and B. CAKeyframeAnimation could be understood as a series of CABasicAnimation.

// Create the path

NSRect frame = [theView frame];

CGMutablePathRef thePath = CGPathCreateMutable();

CGPathMoveToPoint(thePath, NULL, NSMinX(frame), NSMinY(frame)); //the origin

CGPathAddLineToPoint(thePath, NULL, pointA.x, pointA.y); //Point A

CGPathAddLineToPoint(thePath, NULL, pointB.x, pointB.y); //Point B

// Create an animation

CAKeyframeAnimation *originAnimation = [CAKeyframeAnimation animation];

originAnimation.path = thePath;

originAnimation.duration = 2.0f;

originAnimation.calculationMode = kCAAnimationPaced;

// Add this animation

[theView setAnimations:[NSDictionary dictionaryWithObjectsAndKeys: originAnimation, @”frameOrigin”, nil]];

// Activate this animation

[[theView animator] setFrameOrigin:pointB]; //set the point of the last frame

Monday, April 11, 2011

Add an existing framework in Xcode 4

Steps to add an existing framework in Xcode 4:

1. Click the project in the project navigator.

2. In the project editor, click a target.

3. Select 'Build Phases' tab

4. Expand 'Link Binary With Libraries'

5. Click '+' button to add a framework.

6. Go back to the project navigator, you will see the new framework. You can drag it to 'Frameworks' group.

Friday, April 08, 2011

WWDC2010 Session211 Simplifying iPhone App Development with GCD

GCD Overview

1. GCD is part of libSystem.dylib

2. Available to all Apps.

- #include <dispatch/dispatch.h>

3. GCD API has block-based and function-based variants

- Focus today on block-based API

Introduction to GCD recap

1. Blocks

- dispatch_async()

2. Queues

- Lightweight list of blocks

- Enqueue/dequeue is FIFO

3. dispatch_get_main_queue()

- Main thread/main runloop

4. dispatch_queue_create()

- Automatic helper thread

GCD Advantages

1. Efficiency - More CPU cycles available for your code

2. Better metaphors

- Blocks are easy to use

- Queues are inherently producer/consumer

3. Systemwide perspective

- Only the OS can balance unrelated subsystems

Compatibility

1. Existing threading and synchronization primitives are 100% compatible

2. GCD threads are wrapped POSIX threads

- Do not cancel, exit, kill, join, or detach GCD threads

3. GCD reuses threads

Thursday, April 07, 2011

WWDC2010 Session206 Introducing Blocks and Grand Central Dispatch (2)

Grand Central Dispatch

With GCD, you can make your app responsive. Threading is hard. Using GCD makes it simple and fun. You need not do explicit thread management. Cool!

Keeping your app responsive:

1. Do not block the main thread

2. Move work to another thread

3. Update UI back on main threaad

Code without GCD:

- (void)addTweetWithMsg:(NSString*)msg url:(NSURL*)url {

  // Controller UI callback on main thread

  DTweet *tw = [[DTweet alloc] initWithMsg:msg];

  [tweets addTweet:tw display:YES];

  tw.img = [imageCache getImgFromURL:url];//bottle neck

  [tweets updateTweet:tw display:YES];

  [tw release];

}

Code with GCD:

- (void)addTweetWithMsg:(NSString*)msg url:(NSURL*)url {

  // Controller UI callback on main thread

  DTweet *tw = [[DTweet alloc] initWithMsg:msg];

  [tweets addTweet:tw display:YES];

  dispatch_async(image_queue, ^{

    tw.img = [imageCache getImgFromURL:url];

    dispatch_async(main_queue, ^{

      [tweets updateTweet:tw display:YES];

    });

  });

  [tw release];

}

GCD Queues

1. Lightweight list of blocks

2. Enqueue/dequeue is FIFO

3. Enqueue with dispatch_async()

4. Dequeue by automatic thread or main thread

Main Queue

1. Executes blocks one at a time on main thread

2. Cooperates with the UIKit main run loop

3. dispatch_get_main_queue()

Wednesday, April 06, 2011

WWDC2010 Session206 Introducing Blocks and Grand Central Dispatch (1)

Blocks and Grand Central Dispatch are available on iOS4, and have been available on Snow Leopard.

Technology Stack

Technology Stack Block and Grand Central Dispatch  

Blocks

Blacks are available in C++ and Objective-C++.

Basic Blocks

We will use ^ for blocks because this character is unique and could not be used as operator in C++.

Block Literal Syntax

^ [Return type][Arguments] { Body }

Just looks like a function without function name starting with ^. If no return or no arguments, void could be skipped.

Block Syntax

Blocks as Data

We can define Block pointer. It looks like a function pointer: void (*callable)(void);

void (^callable)(void);

This is an ugly block pointer whose argument is also a block pointer.

char *(^worker)(char *a, BOOL(^done)(int));

We can use typedef to simplify it just like what we do for function pointers:

typedef BOOL (^doneBlk_t)(int);

char *(^workB)(char *a, doneBlk_t d);

WWDC2010 Session313 LLVM Technologies in Depth

This session covers: Clang in Xcode 4 (Code completion, Fix-it, Indexing and Edit-all-in-scope), Clients of LLVM(LLDB, Integrated assembler).

Using Clang Inside Xcode 4

Many contents have been covered in Session 312. Just more examples.

Benefits of LLDB Design

Higher fidelity expression parsing and evaluation

Support all language constructs

     Inline function, template instantiation   

     Debugger gets new language features

Less platform specific knowledge in the debugger

Can pull in other compiler features: Fix-it, code completion

Assembler

LLVM Compiler 2.0 have an integrated assembler. We need not generate .s file and parse big text files. It saves much time.

LLVM assembler

Benefits of LLVM Integrated Assembler:

10% f aster builds (for debug builds of many applications)

Better error messages for inline assembly

More useful assembly dumps

WWDC2010 Session313 LLVM Technologies in Depth

Author: Ted Kremenek - Manager, Compiler Frontend Team

Tuesday, April 05, 2011

WWDC2010 Session312 What's New in the LLVM Compiler

LLVM stands for Low Level Virtual Machine which is a compiler infrastructure, written in C++. The LLVM project started in 2000 at the University of Illinois at Urbana-Champaign, under the direction of Vikram Adve and Chris Lattner. In late 2000, Lattner joined the University of Illinois at Urbana-Champaign as a research assistant and M.Sc. student. Lattner was hired by Apple in 2005.

Compiler Landscape

Three compilers

3 compilers

LLVM Compiler in Xcode 3.2.3 does not support C++. You have to use LLVM-GCC for C++ in Xcode 3.2.3. Now LLVM Compiler 2.0 in Xcode 4 supports C++. That is why the default compiler of Xcode 4 is LLVM Compiler. GCC 4.2 is not recommended because Apple will not fix bugs any more.

WebKit, JavaScriptCore, OpenSSL are built with LLVM in iOS 4. Performance improvement: Open SSL 28%, JavaScriptCore 11%.

LLVM Compiler:

1. Fast compile times - Almost 3x faster debug builds

2. Great user features

3. Beautiful error messages

4. compatible with GCC

Clang Frontend is a parser for C family of languages including C, Objective-C, C++.

Clang is part of many great new tools: LLVM Compiler, Xcode Static Analyzer, Xcode 4, LLDB Debugger, OpenCL. Clang is integrated into Xcode 4 for source code indexing, syntax highlighting, code completion, live warnings and Fix-its.

Xcode Static Analyzer
Automatically find bugs by analyzing your code.

WWDC2010 Session315 Using Interface Builder in Xcode 4

Interface Builder is integrated into Xcode 4.

XcodeI4 Interface Builder

All the window or views in a xib file will show in the design canvas not in a separate window any more.

There is a media library in the interface builder. You can preview and add a picture to your UI directly.

Select a control, press Option key, and move your mouse, you will see some useful annotations.

In Identity Inspector, there is a small arrow at the right side of the class. You can click it to browse the definition of this class.

When you select a control, the Quick Help will show some useful info including sample code.

Connection

Ctrl-drag or right-button drag to make connection, insert IBOutlet, IBAction.

Xcode Assistant content: Top-level objects, custom classes, classes with connections.

It is convenient to use Interface Builder in Xcode 4, though there is no more new about Interface Builder.

WWDC2010 Session315 Using Interface Builder in Xcode 4

Author: Kevin Cathey - Interface Builder Engineer

WWDC2010 Session314 Building and Distributing Your App with Xcode 4

This session covers: How to use the Xcode 4 interface to construct and edit projects and targets. How to construct schemes to build, launch, and archive apps, How to build workspaces to relate multiple projects and share schemes with others.

Editing project settings

When you click the project in the project navigator, you will see the project settings in the editor. It is well organized. If you don't know the meaning of an option, you can click 'Quick help for selected item' in the Help menu. If you have enabled Quick Help tab on the right panel, you will see the quick help there. Very convenient. I notice that the default compiler of a new project is set to LLVM Compiler 2.0.

Editing target settings

Editing target settings is similar to editing project settings. Good news is if you have several targets, you can select some of them to see the differences. In Combined view, the different option shows <Multiple values>. In Levels view, you can see the different value for each target. This is an awesome feature I like.

The editor of 'Run Script' build phase of a target setting now support color-highlighting.

Scheme

Covered by Session307.

Workspace

Covered by Session307.

WWDC2010 Session314 Building and Distributing Your App with Xcode 4

Author: Chris Espinosa - Manager, Xcode Core Tools

Monday, April 04, 2011

WWDC2010 Session308 Developing Your App with Xcode 4

This session covers source control, source editor, find an replace and version editor.

Source control

When you create a new project, you have an option to create a local git repository. You can copy a git link from github.com, create a repository in Organizer, and clone it.

Source editor

Assistant editor - the secondary editor to show related file. For example, if you select .h file, the .m file will show in the assistant editor. You can press Option key and click a file to show it in the assistant editor. Option key works for all items. You can right click an item, press Option key and click 'Jump to definition'. Then the definition shows in the secondary editor.

Auto completion

When you want to implement a method declared in .h file, you need not copy that declaration. You just need to type in a couple of letters of that function name, Xcode will show all unimplemented methods automatically. You can use ctrl-space to invoke it manually. However, looks like Xcode 4 indexes a little bit slow, it does not show my method. I closed my xcode, and restarted it. Then my method showed up. Another problem is the shortcut 'Ctrl-space' conflicts with Spotlight of the OS X.

Code Snippet Library

You can create your code snippet by dragging some lines of code into Code Snippet Library.

Example:

static dispatch_once_t once;

dispatch_once(&once, ^{

});

You can give it a name and the shortcut (key word). And you can also add a token. After you used this code snippet, you just press Tab to move the cursor to that token.

Example:

static dispatch_once_t once;

dispatch_once(&once, ^{

<#code#>

});

WWDC2010 Session307 Introducing Xcode 4

Xcode 4 is an all-in-1IDE just like Visual Studio (I have used Visual Studio for more than 10 years. Comparing to Visual Studio, Xcode 3 is not convenient. Fortunately, Xcode 4 changed it). Interface builder is no longer a separate application. You can write code, design UI, debug in Xcode 4. This session covers workspaces, navigation, editing, organizer, version editor, debugging and schemes.

Xcode4

Workspaces

The workspace is similar to Visual Studio's solution. A workspace works as a container(actually it just references files). You can add several projects into a workspace. Visual Studio 2001 supported the solution. Xcode supported the similar thing 10 years later. The difference is Xcode 4 does not force you to create a workspace. You can open a project directly in Xcode4. But you have to create a solution in Visual Studio even if it contains only one project.

Projects can be shared between workspaces. Every workspace has its own index, build folder.

Navigation

The left panel of Xcode 4 contains several navigators.

1. Project navigator - shows all projects and files

2. Symbol navigator - shows class hierarchies, members, functions

3. Search navigator - find and replace

4. Issue navigator - shows warnings and errors

5. Debug navigator

6. Breakpoint navigator - shows breakpoints

7. Log navigator

WWDC2010 Learning Notes and Index

WWDC 2010 provided many useful videos. I only watched a few videos. Obviously, there is much for us to learn. I am going to force myself to learn most of the videos and put the notes on this site. I will extract the important parts and code of the videos and add some comments. The notes will be used for future reference. I will be glad if you are interested.

It is April 2011 now. Why do I learn WWDC 2010 so late? The answer is simple. I did not have time. When WWDC 2010 was held, I just finished my 6-year service to Autodesk. I was busy in developing my apps. I just learned several videos intensively and added iAd and animation to my apps. Now I want to broaden my mind and learn some new techniques.

You can get WWDC session videos here .

Index

WWDC2010 Session211 Simplifying iPhone App Development with GCD

WWDC2010 Session206 Introducing Blocks and Grand Central Dispatch (1)

WWDC2010 Session206 Introducing Blocks and Grand Central Dispatch (2)

WWDC2010 Session307 Introducing Xcode 4

WWDC2010 Session308 Developing Your App with Xcode 4

WWDC2010 Session312 What's New in the LLVM Compiler

WWDC2010 Session313 LLVM Technologies in Depth

WWDC2010 Session314 Building and Distributing Your App with Xcode 4

WWDC2010 Session315 Using Interface Builder in Xcode 4

Saturday, March 12, 2011

Time Machine error (caused by Mac OS X Lion)

My Time Machine did not work today. I saw the following message:

Time Machine Error

I tried rebooting my mac and reformatting my external disk. They did not help. My external disk looks very healthy. There must be something wrong in Time Machine software.

In order to see what happened, I ran this command in the terminal window:

sudo grep backupd /var/log/system.log

I got many errors like this:

Mar 12 09:21:50 localhost com.apple.backupd[432]: Error: (-36) SrcErr:YES Copying /.DocumentRevisions-V100/PerUID/501/1/com.apple.documentVersions/074F6D28-7E46-4BBD-A877-7896143B9D1A.rtf to (null)

/.DocumentRevisions-V100 was created by AutoSave feature of Mac OS X Lion. I recalled I installed Lion on another partition and saved a file on Snow Leopard partition (to test AutoSave). Lion created that hidden folder on Snow Leopard partition and put the auto saved files there. However, the Time Machine software on Snow Leopard is not updated. It cannot recognize that system folder.
It is easy to fix this Time Machine error. Just exclude that hidden folder in Time Machine Preferences. (You need to enable 'Show invisible items'.) I actually excluded the following 3 hidden folders:/.DocumentRevisions-V100/.MobileBackups/.Spotlight-V100
Exclude folders in Time Machine 
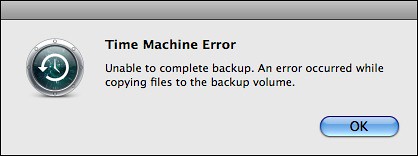
My Time Machine is working again!This command "sudo grep backupd /var/log/system.log" is very helpful.

Thursday, March 03, 2011

Exploring Mac OS X Lion (3): Versions and Auto Save

1. Versions

Versions is really a revolutionary feature of Mac OS X Lion, though it is not as obvious as Mission Control and Launchpad.

The system records every change to a file automatically. You can browse versions and revert your changes if necessary.

If you create a new file in TextEdit and go to File menu, you can see Save menu item.

Lion Versions Save menu

But after you saved your file and make some changes, that menu item will be changed to Save a Version.

Lion Versions Save a version Menu

Wednesday, March 02, 2011

Exploring Mac OS X Lion (2): Trackpad Gestures and Mission Control

Looks like Lion depends heavily on trackpad gestures. You can use gestures to scroll view, show Launchpad, switch desktop, switch full-screen applications, show Mission Control. Mission Control could be considered as an enhanced Exposé.

I listed all gestures on Lion.

1. One Finger

Snow leopard: Tap to Click, Dragging, Drag Lock, Secondary Click

Lion: No change

2. Two Fingers

Snow leopard: Scroll, Rotate, Pinch Open & Close, Screen Zoom, Secondary Tap

Lion: little change. In Safari, two fingers swiping left/right means showing the previous/next page. In Snow leopard, you need to use three fingers to swipe.

3. Three Fingers

Snow leopard: Swipe to navigate.

Lion: Mission Control.

Swipe horizontally to switch desktop, dashboard and the full-screen apps.

3 fingers swipe horizontally in Lion

Exploring Mac OS X Lion (1): Launchpad

In Mac OS X Lion, there is no icon of "Applications" on the Dock. Launchpad replaced it. Launchpad looks exactly like the springboard on iPad. You can make 4 fingers pinch to activate it. Launchpad supports pages and folders. You can drag an icon to rearrange it and drag it out of current page to create a new page. I tried clicking an icon and holding for a while, but did not see icons shaking.

Drag an icon to rearrange in Launchpad of Mac OS X Lion

However, Launchpad on an external big monitor is not beautiful. The icons are too big. It is not comfortable to see so many big icons on the big monitor.

The users who are using 3-button mouse will have a problem. They cannot switch pages of Launchpad. I think it is a bug.

The dock does not show indicator lights for the running applications by default. You can enable it in System Preferences.

Tuesday, March 01, 2011

Steps to install Mac OS X Lion on external hard drive

Apple just released Mac OS X 10.7 Lion developer preview. There are some new features inspired by iPad. The Launchpad looks like iOS springboard. The apps can run in the full-screen mode. You macbook with Lion will look like an iPad.

However, many people including me only have one machine with Snow Leopard installed. We don't want our valuable data destroyed by the beta OS. It is not safe to upgrade the existing OS to Lion in the existing partition. Can we just install Mac OS X Lion on the external hard drive? Yes!

Steps to install Mac OS X Lion on external hard drive:

1. Plug in your external hard drive to your Mac.

2. Open Utility->Disk Utility. You should see your external hard drive in the left view.

3. Choose your external hard drive (not the partitions) in the left view.

4. Choose Partition in the right view and create an GUID partition with Mac OS Extended (Journaled) format.

If your partitions were created in Windows, they are not GUID partitions. You have to delete all of them and create partitions with Mac OS Extended (Journaled) format. Don't forget to click Options button and choose GUID Partition Table! Otherwise, when you install Lion on this partition, you will receive an error message: this partition is not GUID partition.

GUIDPartition

5. After you have created legal partitions, you can start installing Lion. Just in your snow leopard, double click mac os x lion 10.7 .dmg, In the pop-up window, double click "Install Mac OS X", and then click "Continue". Accept the agreement. You will see this window.


Install Mac OS X Lion

6. Click "Show All Disks..." and choose your external hard drive.

7. Follow the instructions on the screen to complete the installation. You will get Lion installed on your external hard drive. If you want to reboot to the snow leopard, just press Option key on the machine startup.

If you installed Lion on another partition and saved a file on snow leopard partition with AutoSave enabled, you may have error on Time Machine in snow leopard. Refer to this post.

My first post

Testing.